How to: Add a snow effect to text in Photoshop

By Elena Santos on 12 December, 2008

I've always preferred to give handmade presents, a piece of handicraft made by myself that makes the gift more personal. Following this idea, and as the holiday season approaches, I like to prepare special Photoshop tutorials to create your own greeting cards. In case you missed them, here's the 2007 tutorial and here's the 2008 one. And for those behind the deadline, here's another easy tutorial that shows you how to add a snow effect to text; a simple yet effective trick you can use for cards, themes and all sorts of Christmas-related graphic.

Text snow effect in Photoshop

1. Open a new document and fill it with a dark color (blue, for example). Then use the Text tool to write your message on it.

Text snow effect in Photoshop

2. Select the Lasso tool and begin drawing shapes on top of the letters. These shapes will become the snow later on, so take your time and draw them as carefully as possible. Also, make them look as if they were dripping from the top down.

Text snow effect in Photoshop

3. Now go to the Channels window and create a new channel by clicking on the button at the bottom bar. Fill that selection with white.

Text snow effect in Photoshop

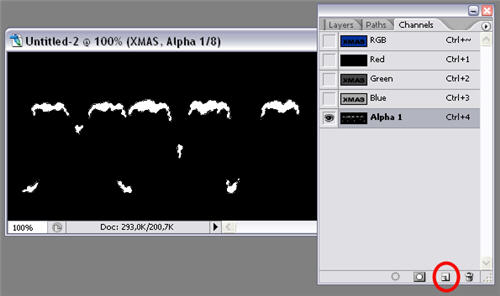
4. Go to Filter > Blur > Gaussian blur and apply a blur effect with a value of about 2 pixels. Then press Ctrl+L and adjust levels so that the snow shapes look sharp and smooth.

Text snow effect in Photoshop

5. Now go back to the Layers window and create a new layer. Go to Select > Load selection and in the Channel field, choose "Alpha 1", the channel you created before. Use the Bucket tool and paint those selections with white.

Text snow effect in Photoshop

6. Add a Bevel and Emboss effect to this layer, to create some shadows in the snow and make it look more realistic.
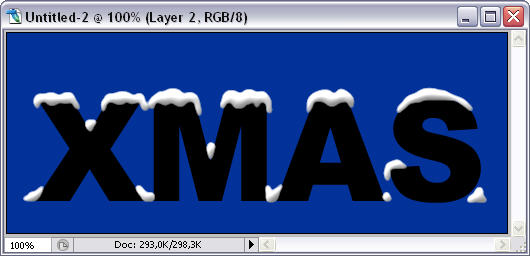
Text snow effect in Photoshop

7. Now you're free to add some effects to the text itself. Select the text layer and play with colors, bevel and emboss, inner shadow, stroke…

Text snow effect in Photoshop

8. Create a new layer between the text and snow layers. Grab the Brush tool, lower its hardness (about 50%) and paint on the newly create layer with white, so that it looks like snow on the ground. Then apply to this layer the same effects you used for the snow layer.

Text snow effect in Photoshop

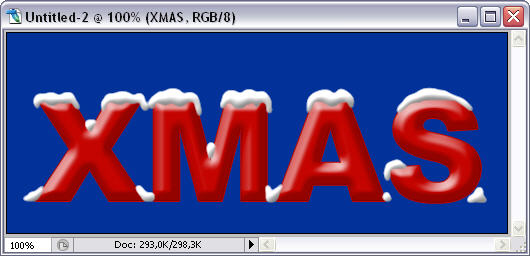
9.  Finally, add some finishing touches like a gradient overlay on the background, another layer with snowflakes, some dropping shadow… Your snowy text is done!

Text snow effect in Photoshop

Comments

  • dick dick

    maa chudaao apni saalo

    • Sent on 13 Dec 2008
  • smath smath

    Well done dear its a very simple, nice and easy tutorial. I really like and appritiate it. Thanks.

    • Sent on 14 Dec 2008
  • yadav yadav

    apni maiya chudao harami chode

    • Sent on 14 Dec 2008
  • Dgtlx.com Dgtlx.com

    We added a link to this post at our site Dgtlx.com. We hope that you don't mind. Actually we are going to get a nice collection of Photoshop tutorials at Dgtlx.com. Please feel free to make a visit at our Photoshop category and check out our links to Photoshop tutorials. http://dgtlx.com/category/photoshop

    • Sent on 18 Dec 2008
  • soumya soumya

    yap.It's cooooool.

    • Sent on 06 Jan 2009
  • psd fan psd fan

    Winter is coming! Very nice effect! thanks

    • Sent on 06 Oct 2009
  • Photoshop Snow Text Action &raquo; Nwe Yoe Photoshop Sno<br />w Text Actio

    [...] အေပၚကလို ပံုတပံုကို လုပ္ရင္ (Photoshop နဲ႔) အခ်ိန္ေတြ အၾကာႀကီး ေပးရမွာ၊ ေနာက္ၿပီး အေပၚမွာတင္ေနတဲ့ ႏွင္းေတြအတြက္ကလည္း လက္ရာက ေသသပ္ဦးမွ၊ ခုလို ခရစၥမတ္နား ကပ္လာေတာ့ အဲဒီအတြက္ အခ်ိန္ မေပးႏိုင္ေတာ့ဘူးရယ္။ ဟိုရက္က ကၽြန္ေတာ္ Banner ေလး ၂ ခုေလာက္ဆြဲဖို႔ကို ရြာေတြလည္၊ တိုင္ေတြပတ္ေနတာ၊ Google မွာ Text အတြက္ Snow Effect ေတြရွာေတာ့ က်ဴတိုရီယယ္ေတြ အမ်ားႀကီး ေတြ႕တယ္၊ ဥပမာ – Click Here [...]

    • Sent on 24 Dec 2009
  • Adrian Adrian

    Thanks i was looking for a while how to do this and thanks to you i found it

    • Sent on 07 Nov 2010
  • Driving Lessons Birmingham Driving Lesso<br />ns Birmingham

    Just in time .Thanks

    • Sent on 07 Nov 2010
  • Guillermo Malagon Guillermo Mal<br />agon

    Thx Excelent cool for a hurry

    • Sent on 13 Nov 2010
  • sexy sexy

    adadadadad

    • Sent on 13 Apr 2011
  • Comment

Softonic on Facebook